



Hino P2123 Fault Code: Accelerator Pedal Position Sensor 1 – Out Of Range (Out Of Range High)




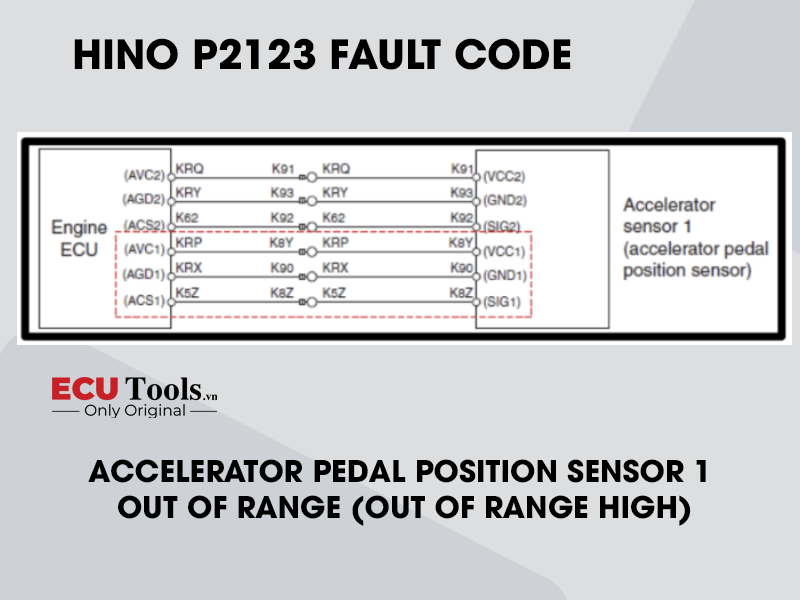
DESCRIPTION OF MALFUNCTION
The accelerator sensor 1 cannot correctly sense
DTC SET CONDITION
DTC Detection Condition:
- Starter switch ON
- Battery voltage is in the range of 10 V to 16 V
Judgment Criteria:
- Accelerator sensor 1 (accelerator pedal position sensor) voltage ≥ 4.1 V (147%).
- Failure timer ≥ 1 second
RESET CONDITION
Immediately after normal operation is restored
INDICATION, WARNING OR SYSTEM CONTROL REGULATION WHEN THE DTC IS SET
- MIL: ON
- SVS light: OFF
- Cruise control function is not available
SYMPTOMS ON THE VEHICLE WHEN THE DTC IS SET
Symptoms on the Vehicle Due to Backup Control (Fail Safe Function):
Cruise control does not work
PRE-INSPECTION WORK
Check that the battery voltage is in the normal range.
AFTER-INSPECTION WORK
- Clear all past DTCs
- Check that no DTC is stored after test drive
POSSIBLE CAUSES
- Harness disconnection or short-circuit
- Malfunction of sensor 1
- Malfunction of engine ECU
INSPECTION PROCEDURE
TROUBLESHOOTING STEPS
Step 1: Inspect the accelerator sensor 1 connector
Check the connection of the accelerator sensor 1 connector (Looseness and poor contact).
Were any failures found?
| Yes | Connect securely, repair if needed. Clear all past DTCs. Check if no DTC is stored after test drive |
| No | Go to Step 2 |
Step 2: Inspect the accelerator sensor 1 unit
- Set the starter switch to the “LOCK” position
- Disconnect the accelerator sensor 1 connector
- Use the electrical tester to measure the resistance between the terminals of the accelerator sensor 1
| MEASUREMENT CONDITIONS | TESTER CONNECTIONS | STANDARD VALUES |
| Starter switch: LOCK | Accelerator sensor 1
VCC1 – SIG1 VCC1 – GND1 SIG1 – GND1 |
2 Ω |

Do the measurements meet the standard value?
| Yes | Go to Step 3 |
| No | Replace the accelerator sensor 1. Clear all past DTCs. Check that no DTC is detected after test drive |
Step 3: Inspect the power supply of the accelerator sensor 1
- Set the starter switch to the “ON” position
- Use the electrical tester to measure the voltage between the terminals of the accelerator sensor 1 vehicle-side connector
| MEASUREMENT CONDITIONS | TESTER CONNECTIONS | STANDARD VALUES |
| Starter switch: ON | Accelerator sensor 1 vehicle-side connector
VCC1 – GND1 |
4.5 – 5.5 V |

Do the measurements meet the standard value?
| Yes | Go to Step 4 |
| No | Go to Step 5 |
Step 4: Inspect the signal circuit of the accelerator sensor 1
- Set the starter switch to the “LOCK” position
- Use the electrical tester to measure the resistance the terminals of the accelerator sensor vehicleside connector
| MEASUREMENT CONDITIONS | TESTER CONNECTIONS | STANDARD VALUES |
| Starter switch: LOCK | Accelerator sensor 1 vehicle-side
connector SIG1 – GND1 |
25 – 35 kΩ |

Do the measurements meet the standard value?
| Yes | Go to Step 7 |
| No | Go to Step 5 |
Step 5: Inspect for short-circuit of the accelerator sensor 1 harness
- Connect the signal check harness to the engine ECU vehicle-side harness. (Do not connect the harness to the ECU)
- Use the electrical tester to measure the resistance between the terminals of the engine ECU (signal check harness) and ground
| MEASUREMENT CONDITIONS | TESTER CONNECTIONS | STANDARD VALUES |
| Starter switch: LOCK | Engine ECU
(signal check harness) AGD1(V45) – Ground ACS1(V47) – Ground AVC1(V50) – Ground |
∞ Ω |
Do the measurements meet the standard value?
| Yes | Go to Step 6 |
| No | Repair or replace the harness. Clear all past DTCs. Check that no DTC is detected after test drive |
Step 6: Inspect disconnection of the accelerator sensor 1 harness
- Connect the accelerator sensor connector
- Use the electrical tester to measure the resistance between the terminals of the engine ECU (signal check harness)
| MEASUREMENT CONDITIONS | TESTER CONNECTIONS | STANDARD VALUES |
| Starter switch: LOCK | Engine ECU
(signal check harness) AVC1(V50) – ACS1(V47) AVC1(V50) – AGD1(V45) ACS1(V47) – AGD1(V45) |
2 Ω |
Do the measurements meet the standard value?
| Yes | Go to Step 7 |
| No | Repair or replace the harness. Clear all past DTCs. Check that no DTC is detected after test drive |
Step 7: Check the DTC detected (Engine ECU) [Diagnostic Tool]
- Connect the vehicle to the diagnostic tool
- Set the starter switch to the “ON” position
- Select [Engine] and check if the DTC P2122 or P2123 has been detected
Has DTC P2122 or P2123 been detected?
| Yes | Replace the engine ECU. Clear all past DTCs. Check that no DTC is detected after test drive |
| No | Procedure completed. Clear all past DTCs. Check that no DTC is detected after test drive |
Whatsapp: +84.899.402.402
Facebook: ECUTools.vn
Youtube: ECUToolsvn
Tiktok: ECUTools
Website: ECUTools.vn
RELATED NEWS
See all